Filter unit Comfort 75
- Powerful sand filter unit for pools up to 40,000 l capacity
- Self-priming filter pump with integrated pre-filter and timer switch
- Connectors for all common pools Ø 32/38 mm plus free INTEX adapter
- 7 way valve with solid adjustment lever
- Comprehensive range of accessories available
Sold Out
The selected product is currently not available. As soon as the product is on stock, we will send you an E-mail.

Product information
Filter unit Comfort 75 has a circulation rate of 7.800 l/h, the connection is 220-240V~ / 50Hz / 550 W. This filter unit can be used for pools with approx. 40.000 l water content and can be connected to all commercially available installation pools with a hose connection Ø 32/38 mm. The filter unit can be used up to a maximum water temperature of 35 ° C. To maintain crystal-clear and sparkling pool water, the filter system can be operated with filter sand as well as with Filter Balls as filter medium.

Timer
Forget all about switching your filter unit on an off manually. Using this timer switch, you can set the filter time you want quickly and easily. The LED’S visible on the display show you the filter times programmed in. One filter cycle every 24 hours can be set. A backup battery in the filter cover saves the data you input, even when there’s a power cut.
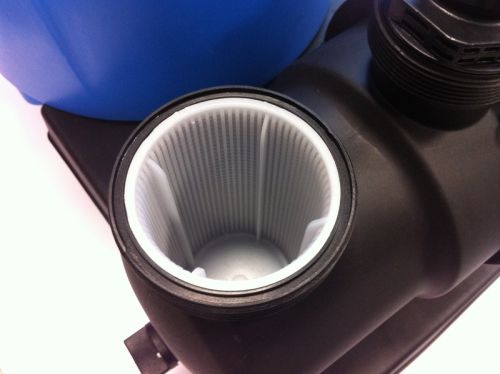
Large pre-filter
The large pre-filter stops coarse dirt particles from getting in. This protects the filter pump fro damage, and also helps stop overloading the main filter area right at the front end. A reduction in the amount of pool care chemicals is just one advantage of this.
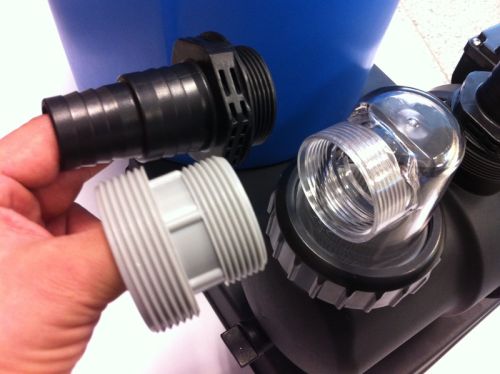
Standard connection and INTEX adapter
The models of the Comfort series have connections for swimming pool hoses Ø 32/38 mm as standard. This means that almost all commercially available swimming pools on the market can be connected. In addition, the Comfort 75 model also comes with 2" special INTEX adapters free of charge to enable you to enjoy the advantages of this Steinbach filter system in these pools too.
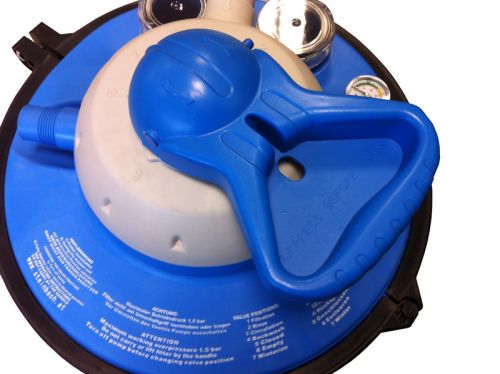
7 way valve
Everyone has a 6 way > here there are 7 options for optimum operational quality and crystal-clear water.
Filter, backwash, rinse, empty, circulate, winter setting, closed
Using the solid dial, you can carry out the whole water cleaning process without getting wet, or having to block off or dismantle anything.
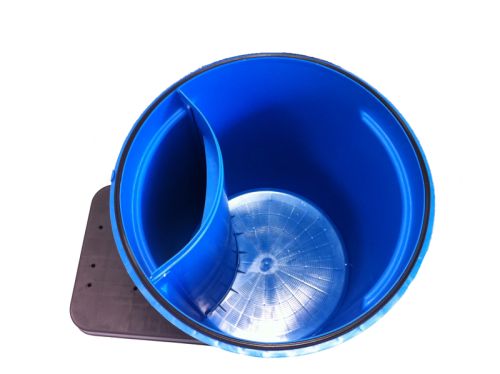
Large chamber for filter sand
Once the 7 way valve is removed, the chamber for the filter sand is visible. The large opening makes it easy and, above all, easy to change the filter sand. With above ground pools, this should be changed every 1 - 2 years.
Filter system:
Salt water suitable: yes
Water capacity: 40.000 l
Circulation capacity: 7.800 l/h
Boiler size: 415 mm
Connection size: Ø 32/38 mm
Valve type: 7-way valve with pressure gauge
Sound pressure level: < 70 dB(A)
Water temperature: 10°C - 35°C
Usable filter medium 1: Quartz filter sand
Quantity of filter medium 1 used: 25 kg
Sand grain size: 0,70 - 1,20 mm
Usable filter medium 2: Filter Balls, Filter Wool Flakes
Quantity of usable filter medium 2: 700 g
Pump part number: 040917
Filter pump:
Power supply: 220-240V~ / 50Hz
Input power maximum: 550 W
Transformer: no
Pump capacity: 9.400 l/h
Operating principle: self-priming
Head: 10,00 m
Pre-filter: yes
Timer: yes
Protection class: IPX5
Insulation class: F
Cable length to unit: 1,50 m
FAQs for Filter unit Comfort 75:
Set the timer on the filter pump to 24 hours. The filter pump is started and stopped with the external timer.
Make sure that you have previously activated the memory backup function of the timer. The following steps must be observed:
- Make sure that the power cable of the pump is disconnected from the power supply.
- Use a PH1 Phillips screwdriver to remove the screws from the timer cover and remove the cover.
- Pull out the plastic strip that can be seen underneath the battery.
- Screw the cover back on again. The timer's memory backup function is now activated.
FAQs from category Sand filter systems:
Remove the transport lock from the button cell battery, otherwise the filter times will not be saved in the event of a power failure. Check the battery (lithium 3V CR2032) and replace it if necessary.
Remove the transport lock from the button cell battery. Set the external timer at the desired times and then plug the pump into the timer. Now start the integrated timer of the pump and set the time to 24 hours. The pump then starts at the times set on the external timer. This does not apply to INTEX filter systems.
With Intex sand filter systems, only the integrated timer works; an external timer cannot be connected due to the safety standards.
Remove the transport lock from the button cell battery. If you do not remove these, the filter times will not be saved in the event of a power failure. Check the battery and replace it if necessary (Button cell lithium 3V CR2032).
No, the red lights are not an error message. The lights on the timer are alternately green and red.
Pressure too high
If the filter performance decreases or the pressure is too high, the filter medium (quartz filter sand, filter balls or Steinbach Filter Wool Flakes) is often soiled and may need to be replaced depending on the operating time and degree of soiling. With sand filter systems, you should switch off the pump and set it to the backwash function. Carry out the backwash process until clean water emerges from the backwash pipe (maximum 2 minutes).
Backwashing is not possible with Filter Balls or Steinbach Filter Wool Flakes. In this case, you should wash the respective filter medium by hand and dry it in the sun or replace it if necessary.
Pressure too low
Low pressure indicates a dirty pre-filter that is restricting the water flow to the pump. Clean the pre-filter and check the suction pipe. Check the water level and the height of the suspension skimmer; if the water level is too low, too little water flows into the pump. Check the pressure gauge for damage.
Clean the pressure line and empty the pre-filter basket. Check whether the suction pipe or the pre-filter basket is blocked and make sure that the inlet nozzle is open if it was closed.
No, the filter system may only run when the pool is not in use. On the one hand, there is a risk of injury from the suction nozzle, on the other hand, dirt particles are swirled around during use, which the system cannot filter.
The filter system should circulate your pool water at least twice a day. Our Comfort 75 filter system, for example, manages approx. 8,000 litres per hour and can therefore completely circulate a pool with 19,000 litres once in just under 2.5 hours.
Check whether the seal (O-ring) is inserted correctly. If it is not placed with the nose in the groove of the vessel, the 7-way valve does not close properly and there is a higher distance between the 7-way valve and the vessel. Check whether the partition in the sand and clean water chamber area is correctly inserted in the sieve bottom. If not, the 7-way valve is also too high. Make sure that the seal at the top of the filter tank is in clean and perfect condition and that no sand is sticking to it. You can coat the O-ring with Vaseline. This serves to preserve the O-ring and additionally supports the sealing. Check that the 7-way valve is correctly fitted with the notch on the underside of the cover and the notch on the filter. Place the 7-way valve on the filter vessel, preferably with the help of a second person. Press the lid onto the filter bowl and make sure that the lid is flush with the vessel.
It is best to close the clamping ring with the help of a second person. A screw clamp can be used as an aid. The clamping ring must be tapped over the skeleton of the valve cover and vessel. If tapping with the palm of the hand is not enough, a rubber mallet can also be used. Start tapping at the back of the bolt and hit the tension ring evenly on the right and left until the ribbed pattern disappears. Then the clamping ring can also be easily closed with the bolt. The closure requires some force and must be a little stronger, as the vessel builds up pressure when used and must seal 100%. Do not use an ordinary hammer under any circumstances. Damage caused by this is not covered by the warranty or guarantee.
Before the first filtering process or after refilling, the undersize of the sand must be removed by backwashing several times until clear water emerges. This is particularly important when filling sand for the first time or refilling sand, as well as for sand that has already been in use for a long time.
When filling the tank, check that the sieve base and separator plate are correctly inserted and that they are not damaged. Before filling the tank with sand, pour about 20-30 cm of water into the tank and fill the sand slowly to avoid damage caused by the weight. Damaged sieve trays or separator plates must be replaced.
Further details can be found in the instructions for the filter system.
Fill the pump with water, loosen the transparent cover on the filter container (do not unscrew completely) to remove trapped air. Tighten the cover again when all air has escaped. Check all connections and hoses for leaks or holes. Retighten connections or hose clamps, seal with Teflon tape and replace the defective parts if necessary.
Depending on the grain size, the filter sand must be changed after three to five seasons.
Check your socket for power and test another socket if necessary.
Never run the pump without water, the pump may run dry and burn out.
Check the mains plug or the connection cable for damage.
Check the running time of the timer, if it is set.
Check the running time of the external timer, if you are using one.
Rust may have accumulated over the winter, which prevents the pump from starting or makes grinding noises when it is switched on. If the rust build-up is not too bad, this fault can be easily remedied. On most pumps, there is a small recess in the cover for ventilation, behind which there is a screw. Use a screwdriver to loosen the screw slightly and spray it with lubricant (e.g. WD40). If the rust has not settled too much, the pump will work again.
Yes.
If you open the lever of the way valve valve during operation, the water will flow with pressure from all openings. The pressure drop may cause damage to the unit.


